Speech recognition in the browser using Web Speech API
Learn how to set up speech recognition in your browser using the Web Speech API and JavaScript.


Speech recognition has become an increasingly popular feature in modern web applications, with recent industry research indicating that companies are moving from exploration to full execution. With the Web Speech API, developers can easily incorporate speech-to-text functionality into their web projects. This API provides the tools needed to perform real-time transcription directly in the browser, allowing users to control your app with voice commands or simply dictate text.
In this blog post, you'll learn how to set up speech recognition using the Web Speech API. We'll create a simple web page that lets users record their speech and convert it into text using the Web Speech API. Here is a screenshot of the final app:
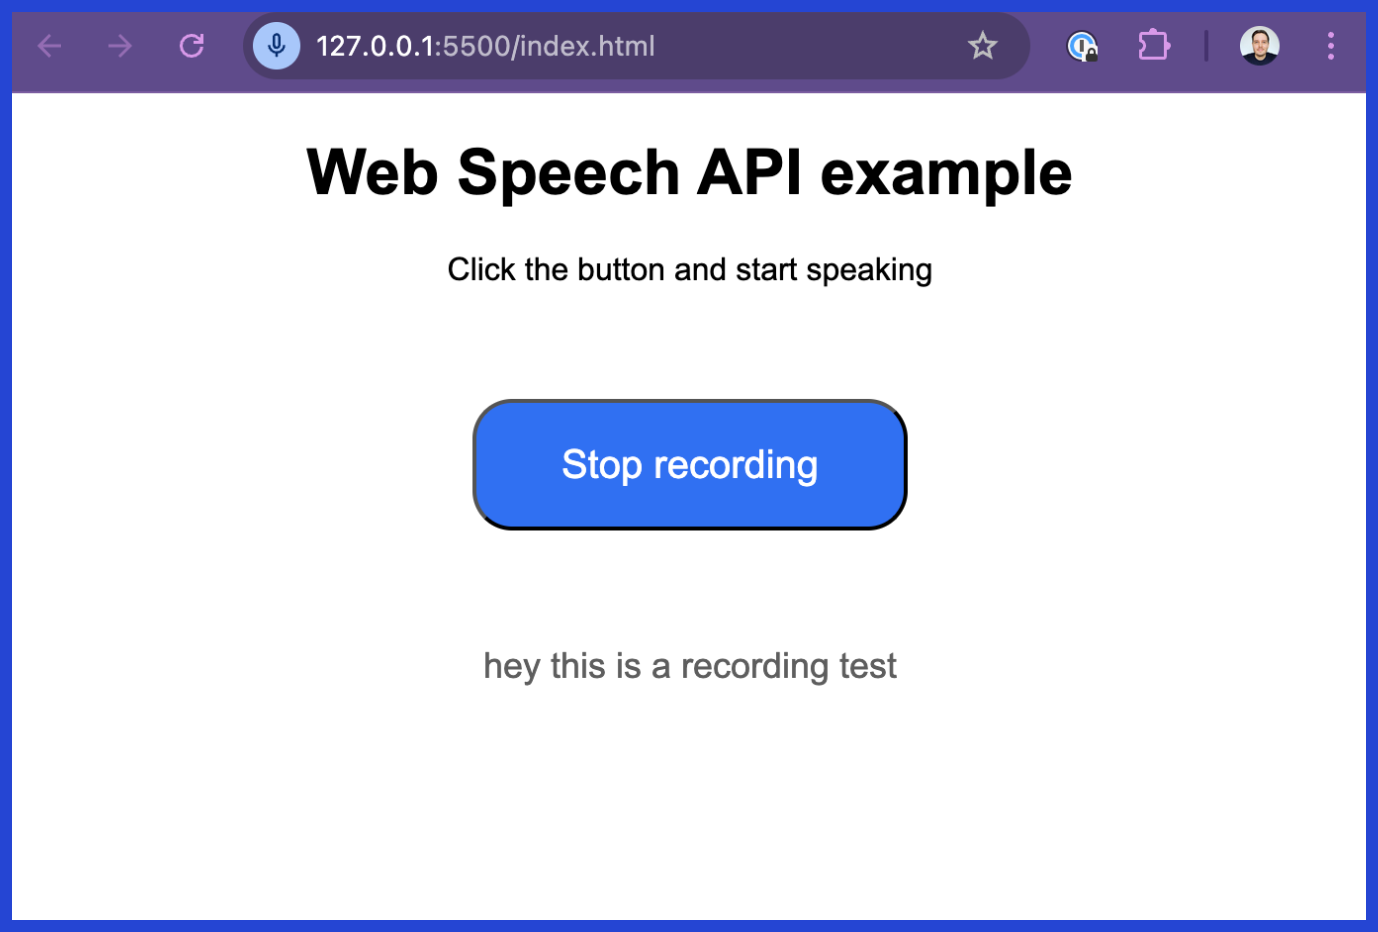
Final app: Speech Recognition in your browser using the Web Speech API
Before we set up the app, let's learn about the Web Speech API and how it works.
What is the Web Speech API?
The Web Speech API is a browser-based JavaScript interface that provides speech recognition and speech synthesis capabilities directly in web applications. It converts spoken words to text and text to speech without requiring external libraries.
The API has two main interfaces:
- SpeechRecognition: Captures microphone input and sends audio to Google's servers for transcription. Returns real-time transcription results to the browser:
// Set up a SpeechRecognition object
const recognition = new SpeechRecognition();
// Start and stop recording
recognition.start();
recognition.stop();
// Handle the result in a callback
recognition.addEventListener("result", onResult);
- SpeechSynthesis: This part of the API takes text provided by the application and converts it into spoken words using the browser's built-in voices. The exact voice and language used depend on the user's device and operating system, but the browser handles the synthesis locally without needing an internet connection.
The Web Speech API abstracts these complex processes, so developers can easily integrate voice features without needing specialized infrastructure or machine learning expertise.
Browser support and compatibility
Before you start building, understand the Web Speech API's major limitation: browser support. Only Chrome and Chromium-based browsers support speech recognition.
Chrome sends captured audio to Google's servers for processing. Other browsers haven't implemented this server dependency:
- Firefox: No speech recognition support
- Safari: No speech recognition support
- Edge: Full support (Chromium-based)
Prerequisites
Let's walk through each step of setting up the Web Speech API on a website, and by the end, you'll have a fully functional speech recognition web app.
To follow along with this guide, you need:
Try speech-to-text in your browser
Experiment with real-time transcription in seconds—no code required. Validate concepts before you build your UI.
- A basic understanding of HTML, JavaScript, and CSS.
- A modern browser (like Chrome) that supports the Web Speech API.
The full code is also available on GitHub here.
Step 1: Set up the project structure
First, create a folder for your project, and inside it, add three files:
index.html: To define the structure of your web page.speech-api.js: To handle speech recognition using JavaScript.style.css: To style the web page.
Step 2: Write the HTML file
We'll start by writing the HTML code that will display the speech recognition UI. The page should contain a button for starting and stopping the recording, and a section for displaying the transcription results.
Add the following code to index.html:
<!DOCTYPE html>
<html lang="en">
  <head>
    <meta charset="UTF-8">
    <meta name="viewport" content="width=device-width, initial-scale=1.0">
    <title>Web Speech API example</title>
    <link rel="stylesheet" href="./style.css" />
  </head>
  <body>
    <h1>Web Speech API example</h1>
    <p>Click the button and start speaking</p>
    <button id="recording-button">Start recording</button>
    <div id="transcription-result"></div>
    <p id="error-message" hidden aria-hidden="true">
      Button was removed<br>Your browser doesn't support Speech Recognition with the Web Speech API
    </p>
    <script src="speechAPI.js"></script>
  </body>
</html>
This HTML creates a button for triggering speech recognition and a div for displaying results. The error message appears when browsers don't support the API.
At the bottom of the body, we'll include a script that points to the speech-api.js file with the Web Speech API logic.
Step 3: Implement speech recognition API logic
Now, we'll move on to writing the JavaScript code to handle speech recognition. Create the speech-api.js file and add the following code:
window.addEventListener("DOMContentLoaded", () => {
  const recordingButton = document.getElementById("recording-button");
  const transcriptionResult = document.getElementById("transcription-result");
  let isRecording = false;
  const SpeechRecognition =
    window.SpeechRecognition || window.webkitSpeechRecognition;
  if (typeof SpeechRecognition !== "undefined") {
    const recognition = new SpeechRecognition();
    recognition.continuous = true;
    recognition.interimResults = true;
    const onResult = (event) => {
      transcriptionResult.textContent = "";
      for (const result of event.results) {
        const text = document.createTextNode(result[0].transcript);

        const p = document.createElement("p");
        p.appendChild(text);
        if (result.isFinal) {
          p.classList.add("final");
        }
        transcriptionResult.appendChild(p);
      }
    };
    const onClick = (event) => {
      if (isRecording) {
        recognition.stop();
        recordingButton.textContent = "Start recording";
      } else {
        recognition.start();
        recordingButton.textContent = "Stop recording";
      }
      isRecording = !isRecording;
    };
    recognition.addEventListener("result", onResult);
    recordingButton.addEventListener("click", onClick);
  } else {
    recordingButton.remove();
    const message = document.getElementById("error-message");
    message.removeAttribute("hidden");
    message.setAttribute("aria-hidden", "false");
  }
});
Code breakdown
- Browser support check: Detects
SpeechRecognitionavailability and shows error if unsupported. - API configuration:
continuous: true- Listens until manually stoppedinterimResults: true- Shows real-time transcription
- Result handling: Updates the DOM with transcribed text and applies
.finalclass to completed results. - Button control: Toggles recording state between start/stop.
Step 4: Style the web page
Next, let's add some styles to make the page a bit more visually appealing. Create the style.css file and add the following styles:
html,
body {
  font-family: Arial, sans-serif;
  text-align: center;
}
#transcription-result {
  font-size: 18px;
  color: #5e5e5e;
}
#transcription-result .final {
  color: #000;
}
#error-message {
  color: #ff0000;
}
button {
  font-size: 20px;
  font-weight: 200;
  color: #fff;
  background: #2f2ff2;
  width: 220px;
  border-radius: 20px;
  margin-top: 2em;
  margin-bottom: 2em;
  padding: 1em;
  cursor: pointer;
}
button:hover,
button:focus {
  background: #2f70f2;
}
This CSS file ensures the button is easily clickable and the transcription result is clearly visible. The .final class makes the final transcription results appear in bold black. Every time the end of a sentence is detected, you'll notice the interim gray text changes to black text.
Step 5: Test the web app
Once everything is in place, open the index.html file in a browser that supports the Web Speech API (such as Google Chrome). You should see a button labeled "Start recording". When you click it, the browser will prompt you to grant permission to use the microphone.
After you allow the browser access, the app will start transcribing any spoken words into text and display them on the screen. The transcription results will continue to appear until you click the button again to stop recording.
Error handling and troubleshooting
Production applications require comprehensive error handling. The Web Speech API fails in predictable scenarios:
Common errors include:
not-allowed: The user denied microphone permission.no-speech: No speech was detected after starting recognition.network: A network error occurred, since Chrome relies on Google's servers.service-not-allowed: The browser or device has disabled speech recognition services.
You can catch these using the onerror event listener:
recognition.onerror = (event) => {
  console.error(`Speech recognition error detected: ${event.error}`);
  // You could add logic here to inform the user or attempt to restart.
};
For a robust application, you should provide clear feedback to the user for each error type and consider implementing logic to automatically restart the recognition service on recoverable errors like network.
Performance considerations and limitations
The Web Speech API has significant production limitations:
When to use a dedicated speech-to-text API
The Web Speech API is great for quick prototypes or simple features. But if you're building a product where transcription quality and reliability directly impact your customer experience, you need a dedicated Voice AI model.
This is where AssemblyAI comes in. Our Universal-Streaming model is designed for production applications that require high accuracy in real-time by delivering transcripts within 300ms over WebSockets. Building with our SDKs, including JavaScript, gives you:
- Industry-leading accuracy: Consistently higher accuracy across noisy environments, diverse accents, and different languages.
- Reliability at scale: Built for production with a 99.9% uptime SLA and the ability to process millions of audio hours.
- Advanced Speech Understanding: Go beyond transcription with features available through our APIs, like Speaker Diarization, Sentiment Analysis, and Summarization for pre-recorded audio.
If you've hit the limits of the Web Speech API and need a solution that can power a world-class product, you can get started in minutes. Try our API for free.
Frequently asked questions about speech recognition in the browser
Which browsers support the Web Speech API?
Only Chrome and Chromium-based browsers (Edge) support the SpeechRecognition interface.
Can the Web Speech API work offline?
No, speech recognition requires internet connectivity to send audio to Google's servers. Only SpeechSynthesis works offline.
How does the Web Speech API compare to a professional API like AssemblyAI?
The Web Speech API is free but limited to basic transcription. Professional APIs offer higher accuracy, uptime guarantees, and advanced features like speaker identification.
Lorem ipsum dolor sit amet, consectetur adipiscing elit, sed do eiusmod tempor incididunt ut labore et dolore magna aliqua. Ut enim ad minim veniam, quis nostrud exercitation ullamco laboris nisi ut aliquip ex ea commodo consequat. Duis aute irure dolor in reprehenderit in voluptate velit esse cillum dolore eu fugiat nulla pariatur.
Related posts